Wet Brining Vs Dry Brining
Smoking-Meat.com is supported by its readers. We may earn an affiliate commission at no extra cost to you if you buy through a link on this page.
Read this article without ads
In this article we'll talk about wet brining vs dry brining and how that all works in a “sciency” sort of way without making it overly complicated.
Let's define the two types of brining:
- Wet Brining – soaking meat, chicken, fish, etc. in a solution of salt and liquid and possibly other less-essential ingredients to add flavor and more moisture. This solution is made up of a ratio of 1 gallon of liquid (usually water) and 1 cup of kosher salt.
- Dry Brining – Applying salt to the surface of meats to add flavor to the inside and to help lock in the moisture that is already present. Kosher salt is usually added at a rate of ½ to 3/4 teaspoon per pound of meat
It's easy to understand that adding salt to meat whether it's part of a solution or added directly to the meat will add flavor to that meat. Salt has been used in various forms for as long as the world has been around to flavor food and make meat, leaves, vegetables, roots, etc. taste better.
And, of course, salt has also been used as well for preservation of foods, especially before the advent of modern refrigeration, but that is fodder for a separate article.
In my experience, wet brining works best on leaner, more delicate meat such as poultry, fish and seafood. Dry brining works best for fattier and more robust cuts such as beef, pork, and lamb. This would also include wild game such as deer, elk, etc.
The caveat might be poultry with skin since these are bad about ending up rubbery when cooking at low and slow temperatures.. the extra water just doesn't help that situation. To combat this, you can use dry brining methods or let the poultry spend some time in the fridge drying AFTER you brine it and BEFORE you smoke it.
Both wet brining and dry brining are somewhat interchangeable though and can be used on any type of meat depending on your desired result and only practice will tell you which you will prefer on various types of meat.
Let's talk about how brining works via denaturing..
- Denaturing is what happens when salt comes into contact with meat. The salt causes the protein strands in the meat to unwind. When this happens, moisture gets caught between these strands. After a while the protein strands change their structure, tangle with one another and the moisture is trapped inside.
Why is this important? Because during the cooking process, moisture is forced out of the meat. With all of that extra moisture trapped inside the protein strands, the moisture is not forced out quite as easily.
In wet brining tests, pieces of meat such as chickens or turkeys will gain weight during the wet brining process. When cooked side by side with non-brined pieces that are of a similar size and weight, the brined test subjects will end up heavier than the non-brined subjects.
This extra weight is water that got trapped and the heat was not able to force it out of the meat during the cooking process. This means it's extra juicy when you cut into it.
We don't have to use science to know this. Brined turkeys, chickens, etc. are noticeably more juicy than ones that have not been brined. The science just proves what we already knew was happening.
While we are on the subject of wet brining, be sure to use glass, stainless steel or plastic to do your brining.. in essence, non-reactive containers. If you happen to use a zip top bag, do yourself a favor and just set it down in a large bowl or pot before placing it in the fridge in case of leakage.
To make a wet brine, add 1 gallon of liquid to a plastic, glass or stainless steel container. Add your salt and stir for a minute or two until the salt dissolves. If you're using water, it will return to clear letting you know that the salt is dissolved.
What about adding sugar and other ingredients to the brine?
Lots of folks add sugar to the brines and I've been known to do it myself from time to time. It doesn't really help the brine process in my opinion but it does add a little something to the flavor and can even help the browning on the outside of the meat. I prefer brown sugar but you can use white sugar, turbinado, or other sweeteners like maple syrup, honey, etc.
Other ingredients such as beer, herbs, spices, hot sauce, flavorings, etc. can be added at will. There is some science that says these things don't penetrate deep into the meat like the saltwater does but it does influence the flavor and I highly encourage experimentation in that regard.
Be sure to write down what you add then if it turns out amazing, you can repeat it. If it turns out not so good, you have a starting place for modifying the recipe to make it better next time.
If you want to see a few wet brine recipes that I use for poultry, check them out here. These also work for fish and seafood.
Types of Salt
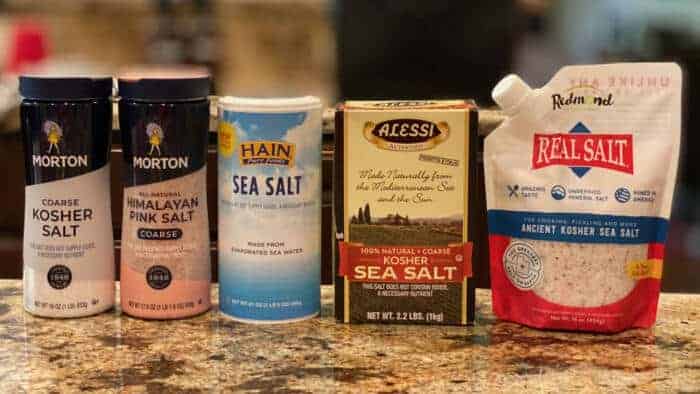
You keep seeing the word Morton's coarse “kosher salt” in this article and in all of my brine recipes and if you're not familiar with that, it's just a coarse type of salt that I use for brining because it has large flakes and dissolves easily without heat.
I also use it in most of my other cooking as well but for a different reason, because Morton's coarse kosher salt is flaked, it sticks to foods a lot better than other kosher salts which are more granular.
It is important that you use the correct ratio of salt to liquid so if you do decide to use a different type or brand of salt, make sure you measure by weight instead of volume. You are looking for 230 grams of salt.
This is not as important in small amounts but once you start using a cup at a time for brining, it's necessary because of the varying density between brands and types of salts.
For example: 1 cup of table salt weighs about 288 grams while 1 cup of Morton's coarse kosher salt weights 230 grams. Huge difference there and it just has to do with the size of the granules and how closely packed together they are.
Table salt has tiny granules and they pack together tightly. This is why you can fit so much more table salt in a given space than kosher salt which is made up of larger flakes that have a lot of space between each piece.
I have been using 1 gallon of liquid with 1 cup of Morton's coarse kosher salt in my brine recipes for decades and it just works perfectly every single time. If you're using a different type of salt, that's ok just make sure to measure it by weight instead of volume when making your brines.
For all brine recipe, I recommend using 1 gallon of water with 230 grams of salt (preferably Morton's coarse kosher salt) but other salts will work as long as the weight is correct.
Need to double the recipe? Still works the same, just double the liquid and double the weight of the salt.
Unlike wet brining poultry, the salt is added directly to the meat. We're not adding extra moisture to the steaks during the dry brining process but that doesn't mean it doesn't end up more juicy.
Salt is added to the top of steak, chops, etc. at a rate of ~½ teaspoon per pound of meat. I often go a little higher than this and use closer to ~¾ teaspoon per pound although I don't generally measure. Once you've been doing this for a long time you start to get a little intuition about how much salt to use.
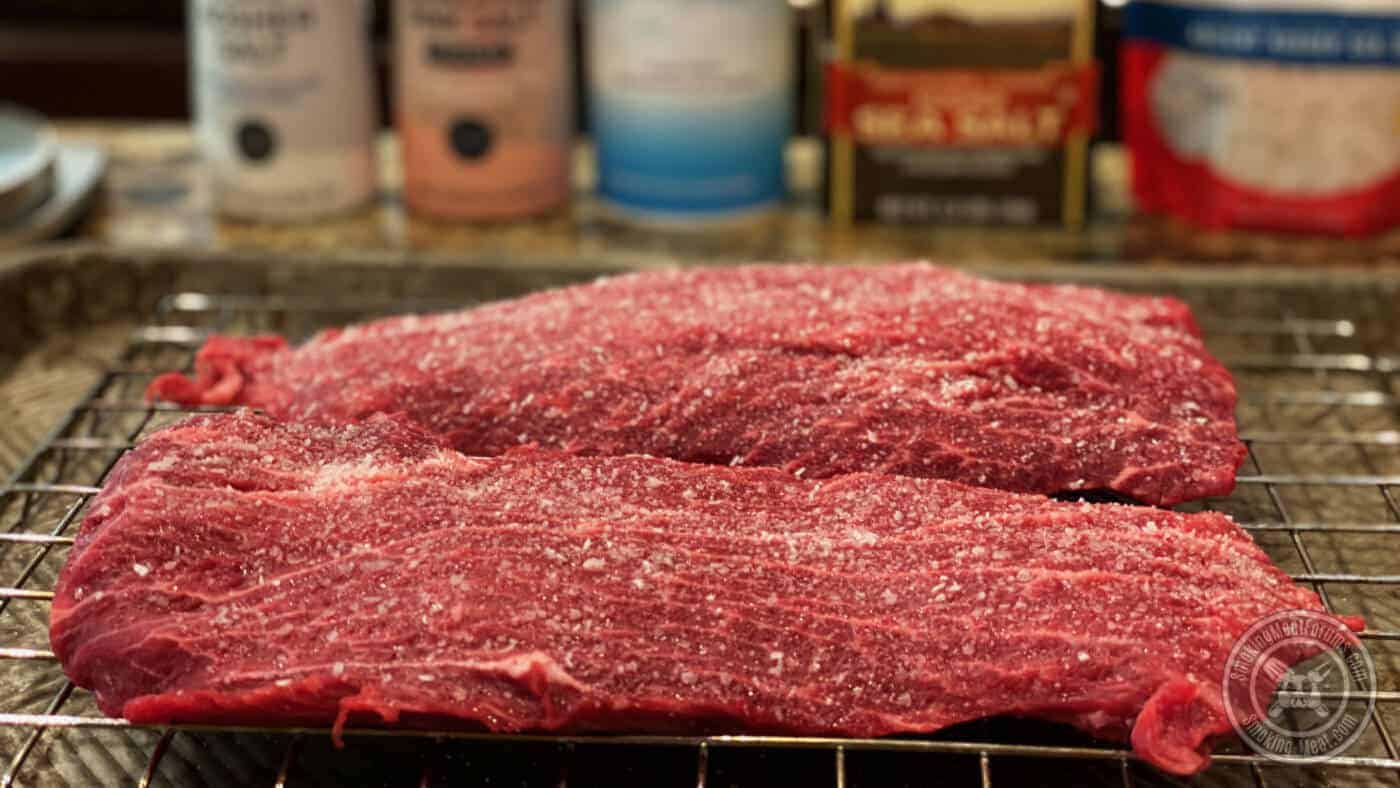
Here' the coverage that I generally use using Morton's coarse kosher salt.
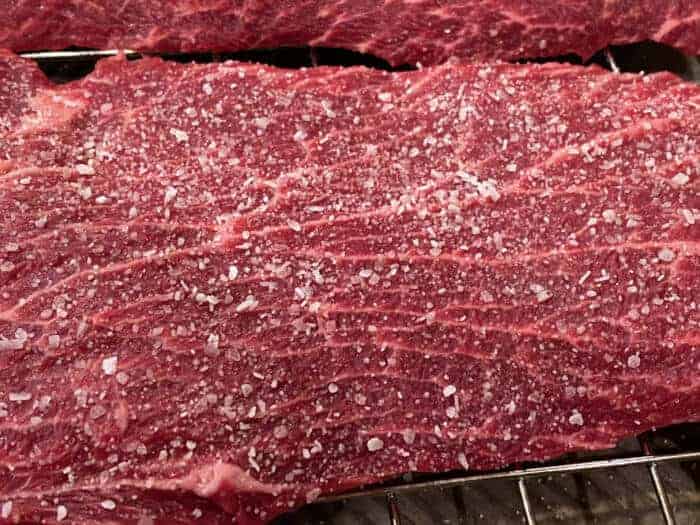
After just a few minutes, the salt begins to pull moisture to the surface of the meat.
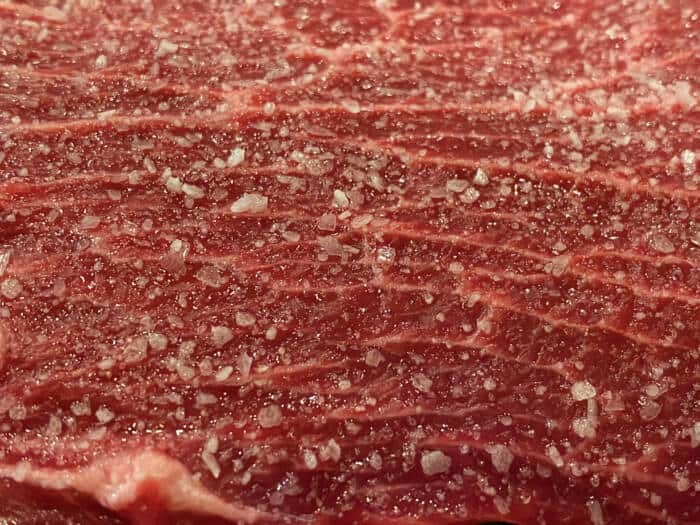
That moisture dissolves the salt and becomes a salty solution (it makes its own brine in essence).
Here's that same steak after only 1 hour. Most of the salt is dissolved and the top of the steak has puddles of brine all over it.
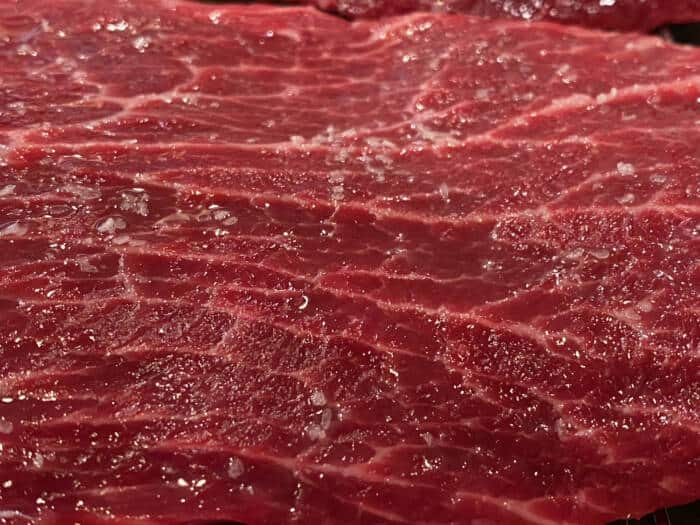
Eventually that salty brine gets reabsorbed back into the meat. This entire process happens over the course of a few hours.
The salt from that brine then causes this same denaturing process to happen in the steak and that reabsorbed moisture gets trapped between the protein strands.
During cooking, just like a chicken or turkey, a dry brined steak ends up with more retained moisture in the end than a non-dry brined steak due to the trapped water that cannot be forced out easily.
Pretty cool, eh?
You may have noticed that I placed the steaks on a rack inside of a pan. I do this to allow air to flow all the way around the steaks while they dry brine and often I will just cook them on that same setup to allow the smoke good access all the way around as well.
Seasoning the Steaks During Dry Brining
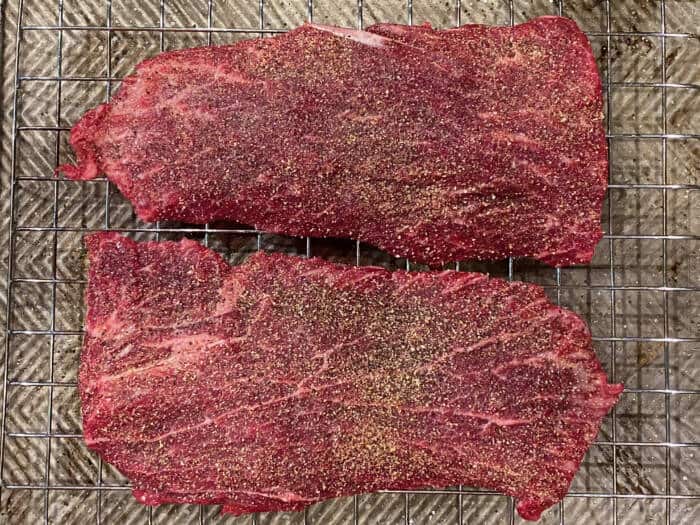
Want to season the steaks as well as dry brine? No problem as long as your rub or seasoning is very low on salt. I often use my original rub and/or Texas style rub during the dry brining process since they are very low on salt. Back in the day, I use to do this as two separate processes where I would dry brine first and then season right before the meat went on the smoker but nowadays, I do the dry brine and seasoning at around the same time and get equally great results.
The perfect scenario is to salt the meat and wait about 5-10 minutes for the juices to start coming to the surface. Now you can add your seasoning to the meat and it will stick to the surface with no need for a binder such as oil, mustard, etc.
One Side or Both Sides?
Often I will dry brine both sides of a thick steak (¾ inches thick or more) but it does require a little more hands-on time.
Dry brine the first side, place it in the fridge for 2-4 hours then remove and dry brine the 2nd side or another 2-4 hours or overnight. When you do this use a lighter coverage than you do when you're only doing one sided. This will ensure that both sides of the steaks or chops end up equally juicy and flavorful.
I have not done a side-by-side test on “one side” vs. “both sides” on thick steaks but it is something that seems to work well for me.
Which is Best? Wet Brining or Dry Brining?
That is not a question that can be answered directly however, each of these methods have properties which will help you decide which is best for the type of meat you are wanting to cook.
Dry Brining:
- Best for fattier cuts such as brisket, pork butt, etc. as well as all steaks regardless of fat content.
- Does not add extra moisture to the meat.
- Less messy
- Saltiness not as uniform as in wet brining.
Wet Brining:
- Best for thinner, leaner cuts such as pork loin, chicken breast, fish, etc with the exception of poultry with skin which is best dry brined.
- Messier than dry brining
- More uniform salting than in dry brining.
- Adds extra moisture to the meat.
Have questions or comments about this article on wet brining vs. dry brining? Post them below.


Hey Jeff:
Great site! It’s my go to when I’m unsure what to do.
Question: I’ve never brined my turkey. Primarily because of space. I always have a big group for Thanksgiving (20 or so) and get a 25lbs bird. Where would I stick this? Do I need a separate fridge?
we need the Dear Jeff: We ALWAYS read website and emails with great interest. You are our source. We suffered a very destructive hurricane now 2 years ago and have not yet made repairs on our home ($160,000 yet to be paid us by our insurance company, and despite our remedial efforts the damage is still readily seen.
Due to all this devastation in nd around our home, and most areas south of us were destroyed. We have been asked to provide brined turkeys, sausage and hams for volunteers coming in from Georgia, Florida, and Texas to help those south of us, rebuild. We need your help. We need the recipes for the turkey brines, and other brines. Thank you for your long relationship with us and helping us help others.
Dr. Carl and Victoria, I am always happy to hear from you guys! I appreciate the work that you do and happy to help get those brine recipes to you.
I have placed all of my turkey/poultry brine recipes on a separate page at https://www.smoking-meat.com/favorite-turkey-brines
Let me know if you need further help with this and keep up the great work!
Hi, I’ve been smoking meat for a couple of years now, but never brined. You talk a lot about smoking steak, poultry, and fish witch is well and good. But I am getting ready to smoke a couple of chuck roasts, so my question is how long would you recommend I let the brine on before smoking?
Hello Do you rinse the wet briner off?
Back in the day, I used to rinse the meat after brining but I have found that it’s really not necessary. It doesn’t hurt anything to rinse if you prefer to do so.
When you are referring to a gallon of water, is that an imperial gallon or a US gallon?
I use the US gallon when making a brine which is equivalent to 3.79 liters (a measurement we can all agree on)😉
Appreciate your information a lot. Thanks. On a brisket, after salt dry brine and adding seasoning during the 8 to 48 hours in the refrigerator. Is the brisket covered or uncovered?
Thanks.
Earl, I usually leave mine uncovered since I have a garage fridge that is only used by me. If you are using the main fridge where someone could drop something and/or mess with(kids) the brisket, I would cover it up. I don’t really have any sound reasoning for covering vs. not covering. It’s always been a thing of convenience for me but there may be other reasoning that I am not aware of or just can’t think of at the moment.
Do you ever inject a brisket? If so, do you need to dry brine?
One doesn’t render the other useless but it is important to thing about the total salt content. For instance, dry brining is fine but then you would want to use an injection but with very little or no salt included. It is also perfectly fine to skip the dry brine and just let the injection do all of the heavy lifting.
I have never really gotten into injections for some reason however, lots of pitmasters use their super secret injections in brisket and win big prize money so it is worth considering for sure.
The people at Serous Eats have tested brining methods and written extensively on it. They tend to recommend dry brining girls essentially everything. https://www.seriouseats.com/how-to-dry-brine
They also tested wet brining versus dry brining of poultry and found that wet brined poultry was only slightly drier than wet brined poultry, however, the dry brined poultry had more flavor and a better texture. https://www.seriouseats.com/the-food-lab-the-truth-about-brining-turkey-thanksgiving
One last thing, dry brining is a lot easier especially because you don’t need a large bucket to hold the meat and brine. Prior to learning about dry brining, I always dreaded cooking turkeys because of the hassle of web brining a turkey. Dry brining is much easier and almost hassle free.
Great article. I learned a lot about the brining process. I truly enjoy all of your posts. You do a great job. Thank you.
Great article! I have a couple questions about brining poultry with skin.
When you apply a dry brine to the skin, how long does it need to be in the frig for the brine to work? Does it add flavor/moisture to the meat as well?
If you do a wet brine on chicken or turkey (with skin) is there a pit temperature you’ve found that will adequatly cook the skin so it’s not so rubbery?
It does depend on the size/thickness of the meat.. for instance I brine fish for about 30 to 60 minutes, whole chickens for 4 hours, turkeys overnight.
When you salt the outside of poultry with skin, the salt works its way through the skin and into the meat just fine. You do not need to make sure the salt is applied to the meat.
Dry brining adds flavor since the salt mixes with the juices in the meat and is then reabsorbed back into the meat. The end result will be a lot more flavorful than it would be otherwise.
Dry brining does not add moisture per se however, it does allow the natural moisture to get locked in between the protein strands and therefore less moisture cooks out of the meat than it would otherwise. This is mostly true for things that are only cooked for a few hours. Eventually moisture does cook out and so things like brisket end up more flavorful, but not really more moist.
I NEEDED THIS! I have used both and have had a variety of experiences. I have also used the ones with apple juice/salt/herbs. I did find it good too! This is so well explained!
Have you ever tried dry brining/seasoning meat just prior to vacuum sealing and freezing? Thoughts?
Not really since I like to control the amount of time the salt is allowed to work on the meat since too much of a good thing, can be.. well.. not so good. Poultry that is brined too long will have an odd texture since the salt messes with the protein strands and this causes the texture to change over time.
It seems that the same thing happens to other things as well such as steaks, briskets, etc. so I think it’s important to dry brine long enough but not too long.
As a general rule, steaks and chops that are 1-2 inches thick are best at 2-4 hours, Chickens are best at about 4 hours, turkeys about 8-10 hours, pork loins about 8-10 hours.
All of these are also okay when left overnight but I never dry brine longer than about 12 hours as I can tell the difference and, in my opinion, it starts to go from a good thing to not such a good thing.
Curing in a brine such as bacon, corned beef, etc. is a completely different thing with different rules so I’m just talking basic brining techniques here.
Have you ever tried wet brining with either pork or beef ribs? Particularly interested in beef as I have lately shifted to beef ribs. I seem to get more consistant results with them.
I have and do dry brine both pork ribs and beef ribs often although in my opinion, it’s just not as effective as it is on other things. Salt does not get absorbed into fat..only meat. Often with pork ribs and beef ribs, there is a lot of surface fat and the salt just does not get absorbed into this. Therefore a good surface rub works best in my opinion.
I definitely recommend that you do some side-by-side tests to see for yourself what you like and don’t like with dry brining things like ribs.
Do you find when cooking a brined turkey, that it cooks a bit faster?
I have not found this to be a significant thing in my own cooking but I’ve heard other cooks talking about it.
One way to speed up the dry brine process, especially if you are trying to make a cheaper cut of beef feel and taste like a better one , is to fork the meat. The holes help the puddled brine soak back in deeper and quicker .
Thanks Jeff for this article it is very interesting. I often use Morton’s Tender Quick salt but it’s getting very hard to find. Is course koser salt a good substitute? It seems to be a lot easier to find. Thanks Again. Keep the good recipes coming 👍
Tender quick is a completely different ingredient.. it contains salt but also contains curing agents. I prefer plain ol’ Mortons blue box coarse kosher salt.
Do you rinse the steaks after a dry brine?
No
No rinse
Dry brine is great, steaks should be apprx. 1.5″ to 2″ thick. I salt both sides and place on a glass baking dish this way the brine liquid is touching the bottom of the meat. Leave it open air in the fridge for 24 hrs… yes the meat will be a little darker. pull it out and set for 45 min’s to an hour to get to room temp., preheat your grill to 600-700 degrees and throw the steaks on and let them sear. I like mine med-rare so I go 2.5 mins each side total, flipping about every 1.25 mins. Of course if you want rare to med cook longer. Enjoy…
If I dry brine with Kosher salt will the meat become salty?
Only if you use more than recommended.. most professionals recommend ½ teaspoon per pound. In my experience this is not nearly enough but it’s a great place to start if you’re new to dry brining. I use ¾ to 1 teaspoon per pound and it’s still not overly salty.
There is also a difference between various types/brands of salt. I recommend finding a brand that you like and stick with it. I always use the same Morton’s blue box coarse kosher salt and this way I am able to learn intuitively how much to use and get it right every time.
One tip. If all you have around is table salt and have to use that, use less. About half less. It seems to stretch a lot further than Kosher or some of the other salts mentioned and can make it salty quick.
I’ve made one key change to your dry brine approach Jeff. For the salt, I splurge and substitute “smoked bacon sea salt”. Two hours each side of steak, and then olive oil with your Texas style rub followed by smoking & searing. The results simply can’t be beat by the best steak house around!
I have read quite a few times to salt a steak, but less than 30 minutes before grilling. So your saying 2 to 4 hours plus is okay? I like your way with other seasoning added better.
It takes a while for the salt magic to work.. the salt draws moisture to the surface. The moisture dissolves the salt. the salty liquid is then absorbed back into the steak. It takes hours and hours for the salt to move through the steak. 2 to 4 hours is minimum in my opinion. 24 hours is ideal (especially for thick steak) and this gives the time for the salt to get deep enough into the steak where it tastes the best.
This is the difference between “seasoning” with the salt vs. brining – if you don’t have the sufficient time to allow the salt to work its magic, then its best to add close to the last minute – 30 minutes even feels too long for me – if its on just long enough to begin to draw out the moisture, but not long enough to allow the protein to become denatured (unraveled) then you will lose that moisture in the cooking process and end up with a dry piece of meat. My process is either no more than 10 minutes of salt contact or no less than 2 hours of salt contact… Hope this helps!
I have tried this with Morton Kosher Salt and I have found that it does add a bit of a salty taste to the meat, however it is very good at tenderizing a cheaper cut of meat. A lot of it depends on how much salt you use and how long you leave it on the meat. I like to cut up and crush either Kiwi or Pineapple and marinade meat in that. It makes the meat very moist and tender without a hint of saltly taste, but don’t leave it sit too long in the marinade, it will start to make the meat mushy.
When dry brining a steak, do you rinse off the salt before grilling it?
Does dry-brining make the meat taste salty?
If you over salt, yes. I’ve found that you don’t have to use alot if salt to achieve good results.
I have a bone ti pick with you about dry brining. I grew up on a farm in the south. Every winter we’d have a hog killing. We would then put the meat in an old bathtub and cover with salt to Dry it out to preserve it. Now you are saying it makes it more juicy. There is a dichotomy here. Salt dries meat out. Even Moses knew that
Salt “pulls” the juices to the surface. On a steak or chop it comes to the surface, dissolves the salt and then is reabsorbed back into the meat.
I have been dry brining steaks for a long time and have way too many great experiences under my belt to refute the amazing outcome.
There must be some part of the pig salting process that causes it to work differently instead of being reabsorbed.. I’m not familiar with that so I can’t say for certain. Perhaps others can chime in on this?
interesting for sure! ;-)
Jeff I was planning on spatchcocking my Thanksgiving turkey and also brining it overnight. I was just wondering if it would be ok to spatchcock it and then put it into the brine or if I should brine first. Will I have any troubles spatchcocking first? Thanks
I usually brine and then spatchcock but either way is perfectly fine.
Dear Jeff…We can’t wait to try this method on our Thanksgiving Turkey. We do not have a smoker so we will be roasting the bird in our oven. I hope you can answer these questions I have:
1) can I still stuff the bird with the usual stuffing?
2) what temp works best for oven roasting the bird? (I usually roast at 325 for about 20 minutes per pound stuffed)
3) does brining shorten the usual and customary roasting time?
4) do I baste the turkey as usual during roasting? I usually cook the giblets on the stovetop in spiced water and use that liquid for basting.
5) will I still get good drippings for making gravy?
Thank you for all your wonderful and useful information.
Kori, brining is known to shorten cooking time a little, not significantly though. Use a good meat thermometer and be sure to remove the turkey from the oven when it reaches 165 in the thickest part of the thigh/breast. I typically remove it at 160-162°F since we know the turkey keeps cooking for a while after removal and carryover cooking will bring it on up to perfect temp.
I recommend cooking it at 325°F in exactly the same way as you always do with the basting, the oven temperature, the stuffing, etc. although you may want to reduce the salt a little in your stuffing and in the gravy since the brined bird will contain a little salt and the dripping will contain a little of that salt as well.
If the gravy or stuffing needs more salt, you can always add it after it’s done cooking.
If you’re concerned at all about the process, do a test chicken in the same way and you’ll get a good idea of what you’re looking at as far as flavor.
Let me know if you have more questions about this.
Jeff, After applying salt for dry brining, should meat be covered when placed in the fridge, or left in open air?
I tend to dry brine everything uncovered since I have my own garage fridge that doesn’t get messed with much except by me however, if you’re doing it in the main fridge where people are getting into the fridge constantly, I would consider covering it to make sure nothing falls on or contaminates the food.
The only exception is poultry where you are trying to dry the skin and this works best if it’s left in the open air for the entire time.
Is there a reason to have the air get all around the meat? Lightly dry brine the bottom and let it sit on the pan and the juice won’t drip off?
Popeye, you may be onto something there. I usually try to allow air to circulate especially with poultry so the skin can dry out after it’s absorbed the moisture but there’s not nearly as much reason to do this with beef/pork. It does seem like if it was sitting flat on the pan, any drips would be absorbed rather than being wasted.
Curious about your thoughts regarding the 2-sided dry brining method. If using a rack / sheet pan for the meat to sit on in the fridge … any reason not to put the salt on both sides (lighter on the bottom side) the whole time and pretty much forget about it (since the air is getting to the whole piece of meat) vs. doing the 2 step salting method (e.g. salt the top for a few hours then flip it and lightly salt the other side)? Maybe concerned about the salt-extracted liquid dripping off the bottom side and not getting reabsorbed?
Bill, The salt draws those juices to the surface and they sort of puddle there while it’s dissolving the salt and being reabsorbed. The salt on the bottom will draw out the juice but it will then drip down into the pan where it’s not able to benefit the meat. It may do some good but not as much as it could.